


If you click on the links in this post, we may earn money from the companies mentioned in this post, at no extra cost to you. You can read the full disclaimer here.
If you want to promote your blog or website on Pinterest, then you’re going to want to create great looking pins – and a lot of them.
Adding pins to your business Pinterest account is a fantastic way to promote individual blog entries as well as pages on your site or products in your online store. (If you’re not familiar with the social media platform of Pinterest, then check out our guide to Pinterest marketing for business first.)
So, what’s the best way to make a pin?
While there are a number of ways to do it, let’s compare two very popular methods – Canva and Stencil.
Both of these methods are great for beginners and do not require prior graphic design knowledge. They also have a much smaller learning curve – and are just easier to use in general – than some of the other tools out there like Photoshop.
But how do they compare to each other? Let’s take a look!
Price
Both Canva and Stencil have free versions. Canva’s free version is fairly robust, and you can make/save as many pins as you want. (You have up to 1GB in storage for photos and assets.) Stencil’s is extremely limited, as in you can only save 10 images a month.
When it comes to the “pro” versions, Canva Pro (formerly Canva for Work) is $12.95/month. It includes everything the free version does, plus unlimited storage, uploading up to 10 of your own fonts, resizing your designs and more.
Stencil has a $15.00/month Pro version and a $20.00/month Unlimited version. The Pro version only allows for saving 50 images a month, which for me would be far too few. (You wouldn’t even be able to save 2 images a day!) If deciding between the two, I would definitely recommend the Unlimited version.
Canva definitely offers more when it comes to a free version, and it’s cheaper than either paid versions of Stencil.
Note: There is sometimes an amazing deal for Stencil – $49.00 for life. No recurring charges. Once you pay that one time fee, you have lifetime access to the Unlimited Plan. If you plan on using Stencil Unlimited for even three months, you’ll save money with this lifetime deal. It’s only available for a limited time, so I would jump on it if you get the chance.
Winner: Canva
Photo Selection
Both Canva and Stencil include photos you can use in your pins. Not surprisingly, the more you pay, the greater the selection of photos. Overall, though, Canva has a better photo selection.
Winner: Canva
Editing Text
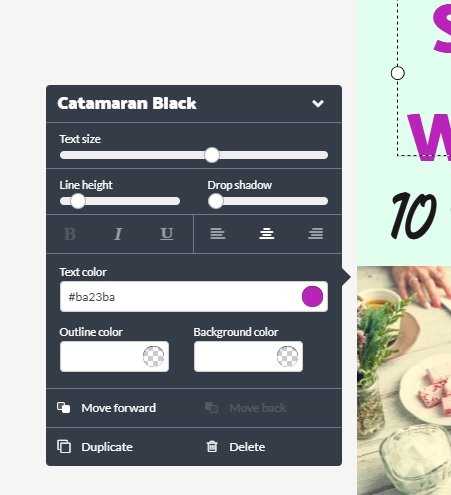
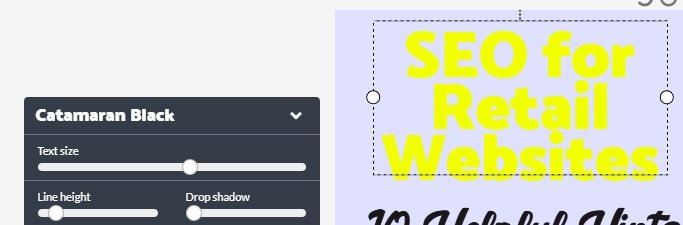
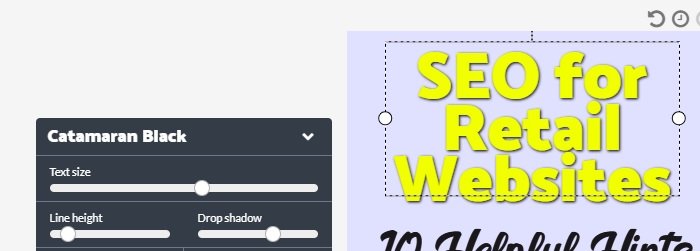
In Stencil, a box pops up with your options for editing your text. You can choose your font here. Sliding from left to right (or right to left) adjusts the text size, line height or drop shadow. Depending on the font, you can make your text bold, italicized or underlined. Orientation of the text can be left, center or right.
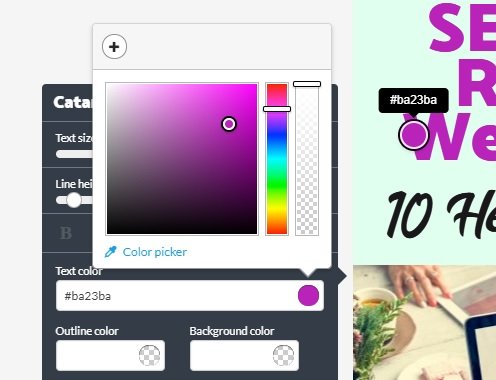
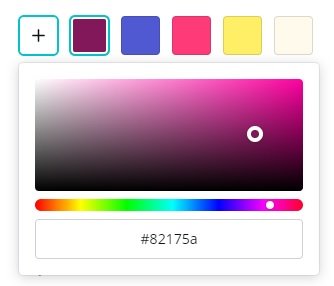
When it comes to text color, you can change the text color, outline color and background color. By outline, this means the outline of the font itself, and the background color is the color of the background of the font (not the background of the pin). You can use the sliding tool to pick a color, you can put in the HTML code (in the picture, it is ba23ba), or you can use the built in color picker to get the text to match another color in your pin.
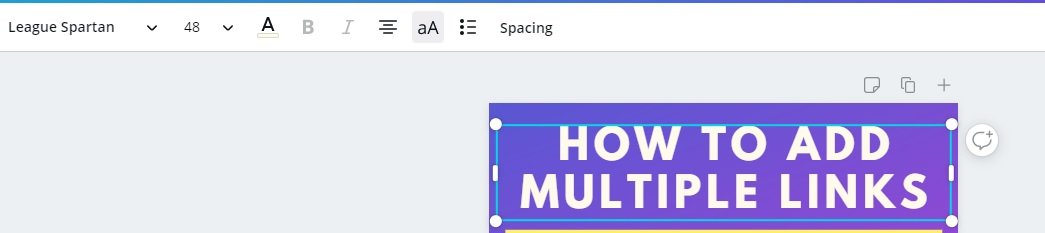
In Canva, you can use the top menu to adjust the properties of your text. You can pick the font by choosing the font size number. Additionally, you can change the font size by expanding or shrinking the box around the text. You do this by clicking on one of the dots in the corner and then dragging the dot.
This text menu in Canva also allows you to change the font, the orientation, the spacing, whether you use bold/italics/underlining, etc. Clicking on the A lets you change the text color – let’s discuss that next.
When it comes to text color, Canva differs from Stencil in a couple of ways.
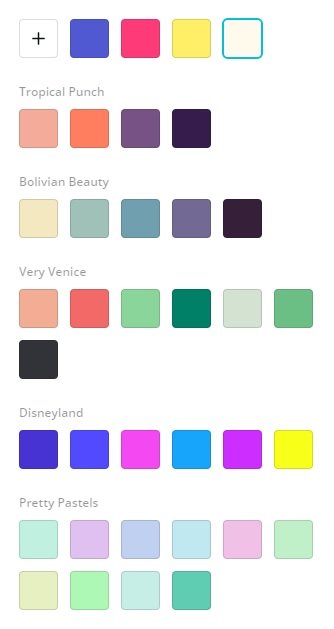
The first way actually gives an advantage of Canva, but only if you use Canva Pro. You are able to save colors in a color palette to use in the future. For example, if you have a few colors that are associated with your brand, you could put that in one color palette. If you make a lot of, say, Halloween pins, and you have a few specific colors you really love or prefer to use (like that perfect shade of pumpkin orange!), then you can save that in its own color palette. In the screenshot, you can see some palettes taken from or inspired by this resource of color palettes, provided by Canva, as well as a couple of other palettes.
Whether you want consistency in your pins or ease of finding your favorite colors (or both), the color palette feature can be very helpful. And if you don’t want to use a color palette, you can always click the plus sign (+) to choose a new color, like this:
Now, you might notice that there is no color picker. Luckily, we have a workaround – you can see how we are able to use a color picker in Canva here.
The second difference is actually a way in which Canva is a bit lacking. In Stencil, you can add an outline to your text (and, actually, drop shadow as well). Here are a few examples:


As you can see, the use of drop shadow, outline color or background color can help make your text stand out in your pin.
Now, in Canva, you can add a square or another shape behind your text, which can give the same effect as background color. You also do have the Effects option, which lets you add some effects like Shadow, Lift, Neon & Echo. However, there is no simple way to replicate the effect of outline color.
This is why I believe that ultimately, Stencil is superior when it comes to formatting text on your pin.
Winner: Stencil
Templates
Both Canva and Stencil offer a wide selection of templates. Some of these templates are designed specifically for Pinterest. Others that are meant for other social media platforms (like Facebook or Twitter) can be resized to Pinterest dimensions if you’re using any version of Stencil or if you’re using Canva Pro. However, Canva offers a far greater number of templates. For example, the free version of Canva gives you access to over 8,000 templates. In comparison, Stencil Pro gives you access to 850+ templates.
Winner: Canva
Custom Fonts
If you’re using a paid plan, you can upload custom fonts. Canva has a limit of 100 fonts, while Stencil has a limit of 50 fonts.
Now, not every Pinterest pin creator will need or even want to use custom fonts. However, for some, it’s a way to make your pins stand out, fit your branding, etc. (Plus, discovering and playing around with new fonts can be fun!)
Winner: Canva
Video Pins
Do you want to create a video pin? Canva gives you options for saving pins in this format. You can upload your own videos to add to pins, add animated elements (like arrows or graphics) or even make a video basically out of a slideshow of image pins.
Stencil currently does not have any options for creating or saving video pins.
Winner: Canva
Conclusion
Really, you can’t go wrong with Canva or Stencil (though I don’t recommend solely using the free version of Stencil as 10 images a month is just not enough).
However, based on our comparisons, Canva is the winner!
No matter what you choose, though, you’ll want a simple and easy way to add your pins to Pinterest. This is where Tailwind comes in! Tailwind is a scheduling tool that helps you space out your pins, lets you schedule them in advance and more.
While you can add all your pins manually, this can be really time consuming – and you’ll still need to set up a system to make sure you aren’t accidentally pinning the same pin too frequently or to the same board multiple times. (This can be seen as spamming, and it also just isn’t a very good use of your Pinterest account!)
Tailwind takes care of both of those issues – and more!
Use this link to get your first month of Tailwind free:
Learn More About Pinterest
Looking for more information about using Pinterest for your blog, business or website?
Check out these additional resources:
The Best Ways to Use Pinterest You’re Not Doing – But You Should Be
The Best Time to Pin on Pinterest
Social Media Myths: Fact or Fiction


