


If you click on the links in this post, we may earn money from the companies mentioned in this post, at no extra cost to you. You can read the full disclaimer here.
Why Use Tailwind Create to Make Pins
Recently, Tailwind released a new feature called Tailwind Create. Tailwind is perhaps best known as a Pinterest scheduler, though it does offer a number of other features (such as Tailwind Communities – where you can share your pins with like minded creators in your niche – and an Instagram scheduler). With Tailwind Create, Tailwind is now a graphic design tool, too.
While I am most comfortable with Canva, which I’ve been using to design pins for several years now, I am always looking for new ways to create pins. And I don’t use Canva exclusively, anyway. So I was very excited to give Tailwind Create a try.
The idea behind Tailwind Create is that it’s supposed to be fast and easy.
You add your logo, choose your preferred font, pick out a color palette and then Tailwind Create will automatically apply those things going forward.
After you upload a photo or photos (or choose from stock photos), write a headline and add a destination link (such as the blog entry you want to link to), Tailwind Create generates a ton of pin options for you.
It’s a great concept: quickly produce several great looking pins without needing to have any graphic design skills yourself.
Let’s see how it works in practice!
*Can’t wait to get started with Tailwind yourself? Sign up here & you’ll get a $15 credit!
Using Tailwind Create
After clicking on the button in Tailwind to design in Design in Tailwind Create, I get a page that says “Initializing Your Pin Creation Experience…” and a short wait.

Next, I filled out the section where you personalize Tailwind Create – you put in your website name, choose a title & subtitle font, pick your main color palette and upload your logo.
For my color palette, I used a color picker to get the exact main color from my logo and used this website to search by the color code and find other complementary colors. If that sounds too confusing or too much work, you could just pick colors right there in Tailwind or use one of their predesigned curated color palettes.
Now, I can really get started!
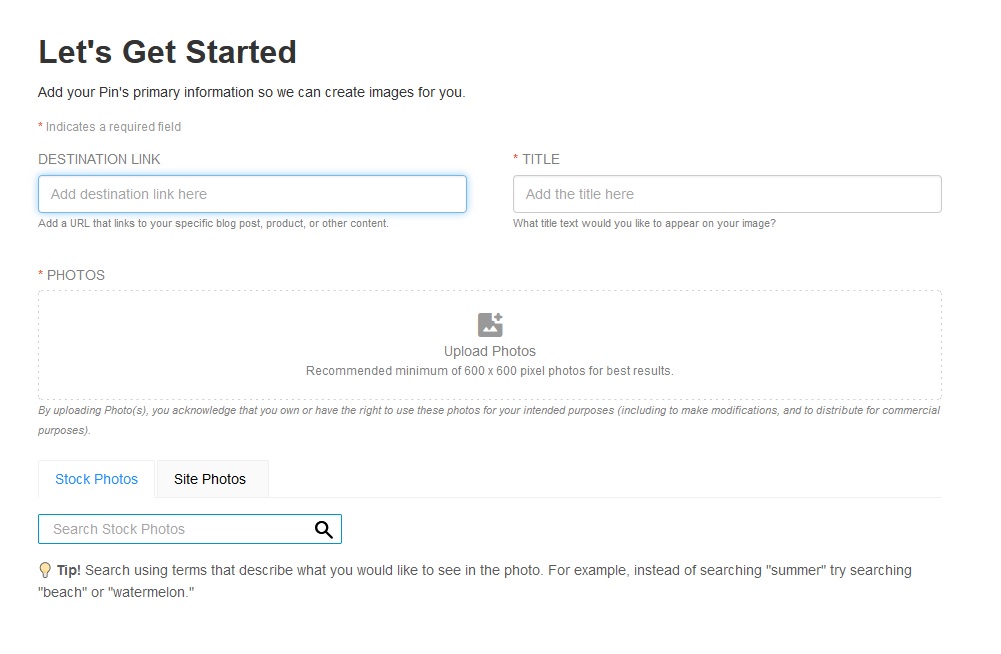
I’m making pins for a specific blog post, so I add the link to that post. I also write a title and go to upload photos.
When I did this, the uploading was slow (I was trying to upload 16 photos). Not only that, but there was no notification, icon or any other indication that the photos were indeed uploading. This resulted in me trying a couple more times to upload them and ultimately triplicates of most photos being added. I then had to go through and remove the photos I didn’t want. Not the worst issue, but it was a bit frustrating.
Next, I have a variety of options and I’m told to choose 2 or 3 designs to tweak to my liking. I’m advised to try to make each pin appeal to a unique audience. (This is according to an informational bubble that pops up when I hover over the “i” icon.)

I do really like the color palette options taken from all the photos, available on the left hand side of the screen.

Scrolling down to view more than just the top row of possible pins is slow and a little glitchy, which I definitely don’t like; but if I move the scroll bar down slowly enough it’s not bad.
There are some filters on the upper right hand side, in case I want to only view possible pins by content type, industry/niche or format. However, I’d like to see all options, just in case something really catches my eye that I wouldn’t normally consider.
After I’ve chosen three, I decide to try on different looks. To change the photo, I have to keep clicking on the photo icon and cycle through the photo options, which takes some time. I can also click on the Edit button, but I don’t find it extremely easy or intuitive – I feel far, far more comfortable in Canva, where I can quickly make a number of changes.

Once I’m done, I download the pins just so I’ll have a copy (just in case, though I’m honestly not sure for what) and then go to schedule them.
Going forward, I think adding a smaller number of photos might be easier (maybe 3-6?) – but adding just one photo might not have given enough options and different looks.
Tailwind Create Video Tutorial
I’ve shared my experiences using Tailwind Create, but maybe you’re more interested in just seeing it in action. If so, then check out this video tutorial if you want to see the exact steps you’ll be taking when you create new pins with Tailwind.
Conclusion – Is Tailwind Create Worth The Cost?
I’ve now used Tailwind Create several times, and I have mixed feelings about whether or not it is worth the extra cost.
If you’re a beginner to pin design and you don’t yet feel comfortable using another tool (like Canva or Stencil), then Tailwind Create might be a good option for you.
If you have been making pins for awhile but you’ve gotten really sick of it, or you feel like you’re in a rut and have no new ideas, then Tailwind Create could also be a good solution.
If you already have a method of pin creation you like, I don’t think you should immediately switch to Tailwind Create and only Tailwind Create. For me, with the pins I’ve created so far, I’m not so sure it would have taken me any longer in Canva. I can – usually – fairly quickly find a previous pin of mine I can copy and then tweak to use for a new pin. I can also – again, generally – create a new pin “from scratch” since I’ve been doing this for awhile. (Of course, some pins are harder than others to design!)
And, similarly, I’ve had slightly mixed results using Tailwind Create. Sometimes I’ve been pretty happy with the automatically generated pins – and there has been at least one time where I just gave up since I couldn’t find anything I liked (and editing their designs was becoming time consuming and frustrating).
Another downside is that Tailwind Create does not, at this time, produce video pins. Canva, however, gives you options for video pins (including uploading your own videos or adding animated elements to image pins). We go over another method for making video pins here.
All that being said…
Tailwind Create, on the lowest level, is free!
For literally nothing a month, you can create 15 pins.
There is definitely enough good here that you should give it a try!
And if you end up liking it, you can always upgrade to a higher plan (right now, the top plan is on sale for only about $25 a month, and you get 300 pins a month).
So, I would recommend the following: try Tailwind Create for free!
If you don’t already have Tailwind, you can sign up for a free trial here. Once your trial is over, you can still use the free Tailwind Create plan. If you want to upgrade to a higher Tailwind plan (which will let you schedule pins as well as purchase a higher Tailwind Create plan), you’ll get $15 off if you use this link!


