


If you click on the links in this post, we may earn money from the companies mentioned in this post, at no extra cost to you. You can read the full disclaimer here.
WordPress Amazon S3 Guide
Today we’re going to go over the following things:
- Why it’s a good idea to store your media library on Amazon S3
- How to connect Amazon S3 to your WordPress Media Library
Why Store Your WordPress Media Library on Amazon S3
Storing your media library on Amazon S3 means you don’t have to store it on your server.
Generally, storing your media library on Amazon S3 is cheaper than paying for a higher web hosting plan that includes extra storage, or paying for disk usage overages with your own web host. (And that’s not even taking into consideration that storing with Amazon S3 is free for your first year, up to 5 GB storage!)
This means you could end up saving a lot of money, especially if you have a lot of images. And you definitely want to feel as if you can add as many images as you want or need to, since adding images can be beneficial to your readers – and well optimized images can improve your website’s SEO (search engine optimization).
Another benefit is that your website should load faster. This is because your media is served directly from Amazon, reducing the load on your WordPress site. Faster load times mean a better user experience and can also help your SEO.
If you’d like your WordPress website to have the benefits of offloading your media to AWS, then luckily there is a plugin for that! And you don’t need to worry about it being complicated, because we’ve outlined all the steps you’ll take to set it up.
How to Connect Amazon S3 to WP Media Library
- Backup your website
It is a good idea to backup your website before you start any of this. This way, if something messes up, you can back it up to its earlier state. If you don’t have an easy way to do this through your web host, consider getting Backup Buddy.
- Buy the Plugin
You will need to buy the WP Media Folder from JoomUnited. You need to buy the $59 version in order to use this with S3.
- Download the Plugin
You will download the plugin you just bought.
- Install & activate the plugin
You will need to install & activate the plugin on your website.
After activating, you’ll be taken to a screen for a configuration wizard. We suggest just keeping all of the defaults the same and keep pressing “Continue”. Do note that the plugin will check your server environment (you don’t have to worry about doing that) and if your PHP settings do not meet the requirements, you’ll need to contact your web host. - Download the plugin add-on
You’ll need to download the plugin add-on
- Install & activate the plugin add-on to your site
You will need to install & activate the plugin on your website.
- Login to Amazon Console
You’ll need to login to your Amazon Console. Sign-up if you don’t already have an AWS account
- Create a new IAM user
Click on this link: https://console.aws.amazon.com/iam/home?region=us-east-1#/users and then click on the Add user button. Then fill in the user name, check the box next to “Programmatic access” and click on the “Next: Permissions” button.

- Add permissions to new IAM member
Click on the button that says “Attach existing policies directly”, type “s3” in the filter policies box and then check the box next to the policy named “AmazonS3FullAccess”. Now click on the “Next: Tags” button.

- Click the “Next: Review” button to keep going
If you need to add your key, add it here. If that doesn’t mean anything to you, don’t worry, just click on the “Next: Review” button.

- Finish creating the user
Click on the “Create user” button.

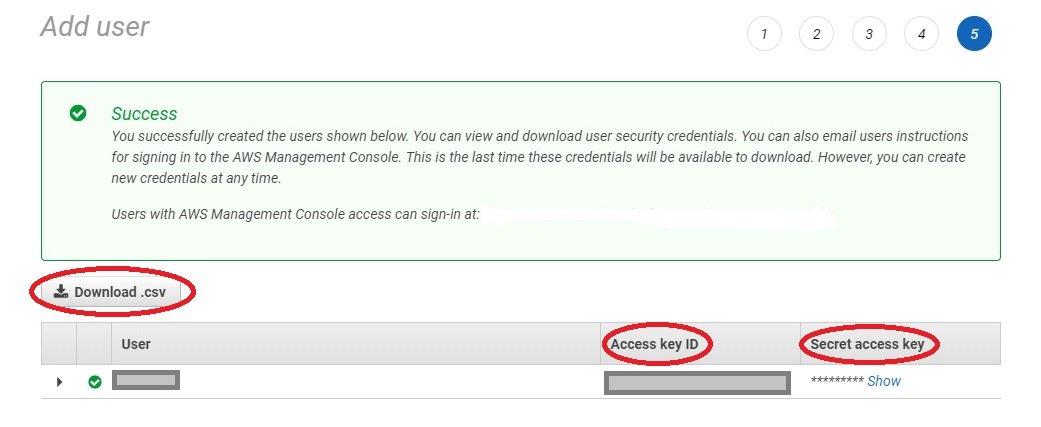
- Save your Access Key ID and Secret Access Key
You should now see a Success screen. Here’s where Amazon will give you an Access Key ID and a Secret Access Key. You’ll need those in our next step, so download the .csv file and also copy them down somewhere safe. (If you lose them later, you can create a new set of keys but you can’t get these back – so it’s easier just to copy them down safely now.)
- Connect the S3 Account into WordPress
Let’s go back to WordPress. Go to Settings > WP Media Folder > Cloud > Amazon S3 tab. Where it says Access Key ID and Secret Access Key, paste the Access Key ID and the Secret Access Key that you got in the previous step. Then, click on the “Save Changes” button.

- Go to Amazon Bucket Settings & Selection
Now that we’ve connected our account, we’ll need to select a bucket to use. First, we’ll click on the button that says “Bucket Settings and Selection”. (If you’ve left the page, you can get back to the right place by going to Settings > WP Media Folder > Cloud > Amazon S3 tab again.)

- Create or Choose an Amazon Bucket
If you have already created a bucket you want to use, then select that existing bucket. Otherwise, you will create a bucket from within the plugin itself – name the bucket where it says “New Bucket Name”, choose a region from the drop down menu, and then click on the “Create” button.

- Change Settings for Future Media Uploads
Next, we’ll want to make sure that all media we upload going forward will copy to Amazon S3 and then the version on our server will be removed. This way, we’ll be storing everything on Amazon S3 and not taking up any disk space with our webhost.
Make sure “Copy to Amazon S3” and “Remove after Amazon S3 upload” are both green (so that the settings are turned on). If it’s not green, then click next to the circle to make it green and turn on the setting.
Turning on the Amazon attachment label is optional – this setting puts a label on your media in the media library so you know if it’s stored on Amazon S3. We personally use that feature on our sites.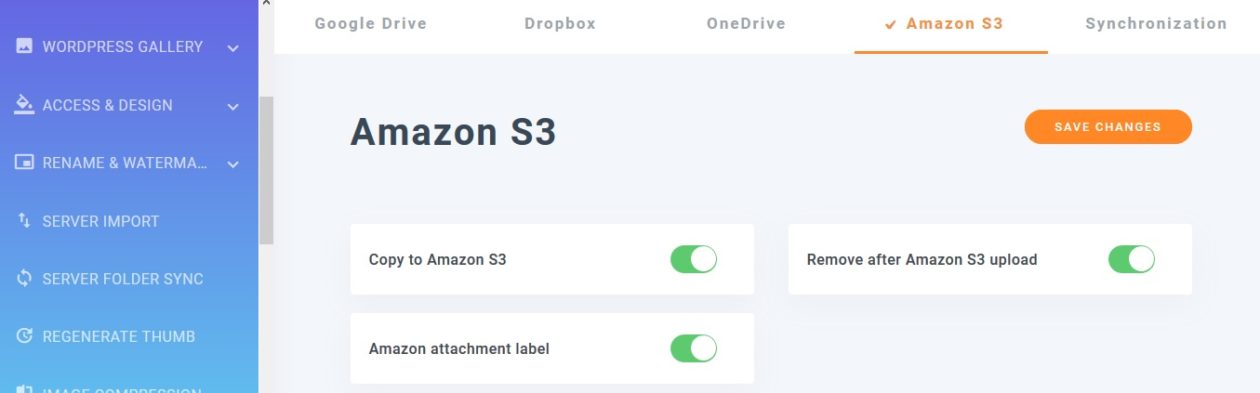
- Synchronize Your Existing Media Library with Amazon S3
Finally, you can synchronize your current media library with Amazon S3, so that you can store the media you’ve already uploaded on Amazon S3 (and stop storing it on your server). Now, be advised that this may take some time – as in, 12+ hours, if you have a lot of media. However, if you’re currently near your limit of disk usage with your web host, this is a really useful feature.
To start the synchronization, just click on the button that says “Synchronize with Amazon S3”. If you’re not sure the library is synchronizing, you can log into the Amazon Console, go to S3, click on the bucket you chose earlier and check to see if your media is being added. Once your entire library has been synchronized, it will show “100%” instead of “0%”.


